Migrate metrics from ELK Stack
Migrating metrics from an existing ELK stack (specifically Elastic Metricbeat) to SigNoz involves configuring the OpenTelemetry (OTel) Collector to replicate your metric collection and send data to SigNoz. The exact steps depend on how Metricbeat was configured, particularly which modules were in use.
This documentation outlines common migration paths.
Option 1: Leveraging Existing Prometheus Exporters
If your Metricbeat setup primarily used the prometheus module to scrape existing Prometheus exporters (like kube-state-metrics or application-specific exporters), the transition can be straightforward. You can configure the OpenTelemetry Collector to scrape these same endpoints.
- Install the OpenTelemetry Collector: If you haven't already, install the Collector in your environment.
- Configure the Prometheus Receiver: Add the Prometheus receiver configuration to your OpenTelemetry Collector (
config.yaml) to scrape your existing targets.
This approach allows you to switch the backend to SigNoz without immediately changing your existing metric exposition setup.
Option 2: Mapping Metricbeat Modules to OTel Collector
The core of the migration involves translating the configuration of each Metricbeat module currently in use to an equivalent OpenTelemetry Collector receiver configuration, along with necessary processors and the exporter for SigNoz.
If you were using specific Metricbeat modules (like system, docker, kubernetes), you need to replace them with equivalent OpenTelemetry Collector receivers.
Here are some common Metricbeat modules and their OpenTelemetry Collector counterparts:
| Metricbeat Module | OTel Collector | Purpose |
|---|---|---|
system | hostmetrics | Collects OS-level metrics (CPU, Mem, Disk, Net, Filesystem, Load) |
docker | docker_stats | Collects container stats from Docker daemon API |
kubernetes (kubelet source) | kubeletstats | Collects node/pod/container/volume stats from Kubelet API |
prometheus | prometheus | Scrapes Prometheus-formatted metrics endpoints (like Kube-State-Metrics) |
You can find many other receivers in the OpenTelemetry Collector Contrib repository or the OpenTelemetry Registry.
Step 1: Plan Your Migration
Before configuring the OpenTelemetry Collector, follow these planning steps:
- Identify Active Metricbeat Modules: Review your
metricbeat.ymlandmodules.d/directory to determine which modules (system, docker, kubernetes, prometheus, etc.) are enabled and collecting metrics. - Analyze Module Configuration: For each active module, note its specific configuration: metricsets enabled, collection period, connection endpoints, authentication details, and any processors applied.
- Find Equivalent OTel Receiver: Consult the OpenTelemetry Collector Contrib registry or documentation to find the receiver that provides similar functionality.
- Identify Necessary Processors: Determine which OTel processors are needed to replicate Metricbeat's metadata enrichment (like
add_host_metadata,add_cloud_metadata,add_kubernetes_metadata) and ensure robust operation (likebatch,memory_limiter). Common OTel processors includeresourcedetection,k8sattributes,batch, andmemory_limiter. - Determine Exporter Needs: Confirm the endpoint and authentication details required for your SigNoz instance (Cloud or Self-hosted) to configure the
otlporotlphttpexporter.
Step 2: Configure OTel Receivers (Replacing Metricbeat Modules)
Now, configure the OTel receivers identified in Step 1 to match the functionality of your active Metricbeat modules. Add these configurations under the receivers: section in your Collector's config.yaml.
Here are common mappings and example configurations:
Metricbeat system -> OTel hostmetrics Receiver
- Purpose: The
hostmetricsreceiver collects OS-level metrics like CPU, memory, disk I/O, network I/O, filesystem usage, and system load, directly replacing the core functionality of the Metricbeatsystemmodule. Process and paging/swap metrics can also be collected. - Configuration: Enable the receiver under the
receivers:section. Set thecollection_intervalto match theperiodused in Metricbeat. Configure the specific metrics to gather using thescrapers:block, enabling entries likecpu,memory,disk,network,filesystem, andload. Filters can be applied within scrapers, for instance, to include/exclude specific filesystem types or network interfaces. If running the Collector in a container to monitor the host OS, mount the host's root filesystem (or relevant parts like/proc,/sys/fs/cgroup) into the container and setroot_path: /hostfsin the receiver config. Theprocessscraper can be enabled but might require the Collector to run with elevated permissions. - Example YAML (collecting core system metrics every 60s):
receivers:
  hostmetrics:
    collection_interval: 60s # Match Metricbeat's 'period' setting
    # root_path: /hostfs # Uncomment if Collector runs in a container monitoring the host OS
    scrapers:
      cpu:      # Collects CPU utilization, time, etc.
      memory:   # Collects memory usage (RAM, swap)
      disk:     # Collects disk I/O operations, time, etc.
      network:  # Collects network I/O bytes, packets, errors, connections
      filesystem: # Collects filesystem usage (space used/free)
        # Example: Exclude specific filesystem types if needed (e.g., virtual/temporary)
        # include_fs_types:
        #   match_type: strict
        #   fs_types: [ext4, xfs, btrfs] # List desired filesystem types
      load:     # Collects system load average (1m, 5m, 15m)
      # Optional scrapers:
      # process: # Collects per-process CPU/memory (may require elevated permissions)
      #   mute_process_name_error: true # Mute errors if process name can't be read
      #   mute_process_exe_error: true  # Mute errors if executable path can't be read
      #   mute_process_io_error: true   # Mute errors if I/O stats can't be read
      # paging: # Collects paging/swap activity
Metricbeat docker -> OTel docker_stats Receiver
- Purpose: Replaces the Metricbeat
dockermodule by querying the Docker daemon API for container statistics (CPU, memory, network, block I/O). Requires Docker API v1.22+ and runs on Linux. - Configuration: Specify the Docker daemon endpoint, typically
unix:///var/run/docker.sock. Set thecollection_intervalandtimeout. Usecontainer_labels_to_metric_labelsorenv_vars_to_metric_labelsto map container metadata onto metric labels, similar to Metricbeat'sadd_docker_metadataprocessor. Filter which containers are monitored usingexcluded_images(supports strings, regex, globs). Setapi_versionif the Docker daemon requires a specific version. Themetricssection allows enabling/disabling specific metrics; importantly, ensurecontainer.cpu.utilizationis enabled ascontainer.cpu.percentis deprecated. The Collector needs access to the Docker socket, usually via a volume mount in containerized deployments. - Example YAML (collecting every 10s, mapping label 'app'):
receivers:
  docker_stats:
    endpoint: "unix:///var/run/docker.sock" # Default Docker socket path
    collection_interval: 10s # Match Metricbeat's 'period'
    timeout: 5s # Timeout for Docker API calls
    # api_version: "1.41" # Specify only if non-default API version is needed
    # Example: Map container label 'app' to metric label 'service_name'
    container_labels_to_metric_labels:
      app: service_name # Key is container label, value is desired metric label
    # Example: Map environment variable 'SERVICE_TIER' to metric label 'tier'
    # env_vars_to_metric_labels:
    #   SERVICE_TIER: tier
    # Example: Exclude containers with image names matching 'test-*' or exactly 'debug-tools'
    # excluded_images:
    #   - 'test-*'
    #   - 'debug-tools'
    # Ensure standard metrics are enabled (defaults are usually sufficient)
    # Explicitly enable the current standard CPU metric:
    metrics:
      container.cpu.utilization:
        enabled: true
      # Optional: Explicitly disable the deprecated CPU metric if causing issues
      # container.cpu.percent:
      #  enabled: false
Metricbeat kubernetes (kubelet source) -> OTel kubeletstats Receiver
- Purpose: Replaces the Metricbeat
kubernetesmodule functionality that collects metrics directly from the kubelet's/stats/summaryAPI endpoint. This includes metrics for nodes, pods, containers, and volumes running on that specific node. - Configuration: Set the
collection_interval. Configure authentication usingauth_type. Common options areserviceAccount(uses the pod's service account token and CA cert found at/var/run/secrets/kubernetes.io/serviceaccount/) orkubeConfig(uses~/.kube/configorKUBECONFIGenv var, often for collectors outside the cluster). Thetlsoption allows specifying explicit certificate paths. Set theendpoint, typically targeting the secure kubelet port 10250 (e.g.,https://${env:K8S_NODE_NAME}:10250). TheK8S_NODE_NAMEenvironment variable must be passed into the Collector pod using the Downward API (fieldRef: spec.nodeName) when running as a DaemonSet. Useinsecure_skip_verify: trueif the kubelet certificate is not signed by a trusted CA (common in some managed K8s like EKS or self-signed setups). Specify whichmetric_groupsto collect:node,pod,container,volume. Useextra_metadata_labelsto add useful identifiers likecontainer.idto the metrics. Requires a ServiceAccount with appropriate RBAC permissions (ClusterRole allowing GET access to/nodes/proxyand/nodes/stats). This receiver is almost always deployed as a DaemonSet. - Example YAML (DaemonSet, secure port 10250, service account auth, 10s interval):
receivers:
  kubeletstats:
    collection_interval: 10s # Match Metricbeat's 'period'
    auth_type: serviceAccount # Use pod's service account token
    # Endpoint uses K8S_NODE_NAME env var injected via Downward API in DaemonSet spec
    endpoint: "https://${env:K8S_NODE_NAME}:10250"
    # Set to true only if necessary, e.g., self-signed certs or EKS default setup
    insecure_skip_verify: true
    # Specify which groups of metrics to collect
    metric_groups:
      - node      # Node-level metrics (CPU, memory, filesystem, network)
      - pod       # Pod-level metrics (CPU, memory, network)
      - container # Container-level metrics (CPU, memory)
      - volume    # Volume metrics (available, used bytes, etc.)
    # Optional: Add container ID as a label to container metrics
    # extra_metadata_labels:
    #  - container.id
Step 3: Configure Essential OTel Processors
Processors transform or enrich telemetry data. Add these configurations under the processors: section in your config.yaml to replicate Metricbeat metadata addition and ensure stability.
batch Processor (Recommended for Performance)
- Purpose: This is crucial for performance and efficiency. It groups metrics (and traces/logs) into batches before sending them to the exporter, significantly reducing the number of outbound network connections and improving throughput. Recommended defaults often work well, but
send_batch_sizeandtimeoutcan be tuned. - Example YAML:
processors:
  batch:
    # Sends batch if size reaches 8192 or 1 second passes
    send_batch_size: 8192
    timeout: 1s
    # Optional: Limit max batch size in bytes (e.g., 1MB) if needed for backend limits
    # send_batch_max_size: 1048576
memory_limiter Processor (Recommended for Stability)
- Purpose: While not directly replacing a Metricbeat feature, this processor is a best practice for Collector stability. It prevents the Collector process from consuming excessive memory and crashing under heavy load by checking memory usage periodically and forcing garbage collection or dropping data if limits are exceeded.
- Example YAML:
processors:
  memory_limiter:
    # Check memory usage every second
    check_interval: 1s
    # Set memory limit (e.g., 1 GiB). Adjust based on available resources.
    limit_mib: 1024
    # Set spike limit (e.g., 25% of limit_mib). Allows temporary spikes.
    spike_limit_mib: 256
    # Recommended for metrics pipeline: use % of limit rather than fixed MiB
    # limit_percentage: 75
    # spike_limit_percentage: 25
resourcedetection Processor (Replaces add_host_metadata, add_cloud_metadata)
- Purpose: This processor automatically adds resource attributes identifying the environment where the Collector is running. It replaces Metricbeat's
add_host_metadataandadd_cloud_metadataprocessors. Enable the detectors relevant to your environment (env,system,ec2,gcp,azure, etc.). - Example YAML:
processors:
  resourcedetection:
    # Detectors to use: 'env' reads OTEL_RESOURCE_ATTRIBUTES, 'system' gets hostname/OS.
    # Add cloud provider detectors (ec2, gcp, azure) if applicable.
    detectors: [env, system, ec2] # Example for AWS EC2
    # Timeout for detection process
    timeout: 2s
    # By default, detected attributes won't override existing ones. Set to true if needed.
    # override: false
k8sattributes Processor (Replaces add_kubernetes_metadata)
- Purpose: Essential in Kubernetes environments. It enriches telemetry data with Kubernetes metadata like pod name, namespace, node name, deployment name, etc., by correlating the data source (e.g., pod IP) with Kubernetes API information. This replaces Metricbeat's
add_kubernetes_metadata. It's crucial for filtering and grouping metrics by K8s objects in SigNoz. Requires RBAC permissions for the Collector's ServiceAccount. When running as a DaemonSet, it needs the node name (viafilter.node_from_env_var) to associate data correctly. - Example YAML:
processors:
  k8sattributes:
    # How the processor authenticates to the K8s API server
    auth_type: serviceAccount # Or 'kubeConfig' if running outside the cluster
    # When running as DaemonSet/agent, pod IP is usually available directly from connection.
    # Set passthrough: true if receiver already provides pod IP (less common for metrics).
    passthrough: false
    # Required when running as DaemonSet: Specify env var holding the node name
    filter:
      node_from_env_var: K8S_NODE_NAME # Must match the env var name in the pod spec
    # Define which metadata to extract and add as resource attributes
    extract:
      metadata:
        # Standard recommended fields
        - k8s.pod.name
        - k8s.pod.uid
        - k8s.namespace.name
        - k8s.node.name
        - k8s.pod.start_time
        # Add owner references if needed (e.g., deployment, replicaset)
        - k8s.deployment.name
        - k8s.replicaset.name
        - k8s.statefulset.name
        - k8s.daemonset.name
        - k8s.cronjob.name
        - k8s.job.name
      # Example: Extract specific pod labels (e.g., 'app' label)
      # labels:
      #   - key: app # Extracts label with key 'app'
      #     from: pod # Source is the pod object
      # Example: Extract specific pod annotations
      # annotations:
      #   - key: mycompany.com/owner # Extracts annotation with this key
      #     from: pod
Step 4: Configure the OTLP Exporter for SigNoz
To configure a specific receiver and add it to your Collector's pipeline, follow the instructions for your SigNoz setup:
Option 3: Switching to Native OTLP Metrics
For new applications, or as a long-term goal when migrating away from legacy exporters, instrument your applications directly using OpenTelemetry SDKs and export metrics via the OpenTelemetry Protocol (OTLP).
- Instrument your applications with OpenTelemetry SDKs for your specific language.
- Configure the SDK's OTLP exporter to send metrics directly to your OpenTelemetry Collector (or the SigNoz OTLP endpoint). Example for Python:
from opentelemetry import metrics
from opentelemetry.exporter.otlp.proto.grpc.metric_exporter import OTLPMetricExporter
from opentelemetry.sdk.metrics import MeterProvider
from opentelemetry.sdk.metrics.export import PeriodicExportingMetricReader
from opentelemetry.sdk.resources import SERVICE_NAME, Resource

# Service name helps identify your metrics in SigNoz
resource = Resource(attributes={
    SERVICE_NAME: "your-service-name"
})

# Configure the OTLP exporter endpoint
# For SigNoz Cloud: Use the region-specific OTLP endpoint and include headers for auth
# For Self-Hosted SigNoz: Use your Collector's OTLP endpoint (e.g., http://otel-collector:4317)
reader = PeriodicExportingMetricReader(
    OTLPMetricExporter(endpoint="http://<SigNoz-OTLP-Endpoint-Address>:4317") # Adjust endpoint/protocol (grpc/http)
    # headers=("signoz-ingestion-key", "<YOUR_SIGNOZ_INGESTION_KEY>") # Required for SigNoz Cloud
)
provider = MeterProvider(resource=resource, metric_readers=[reader])
metrics.set_meter_provider(provider)
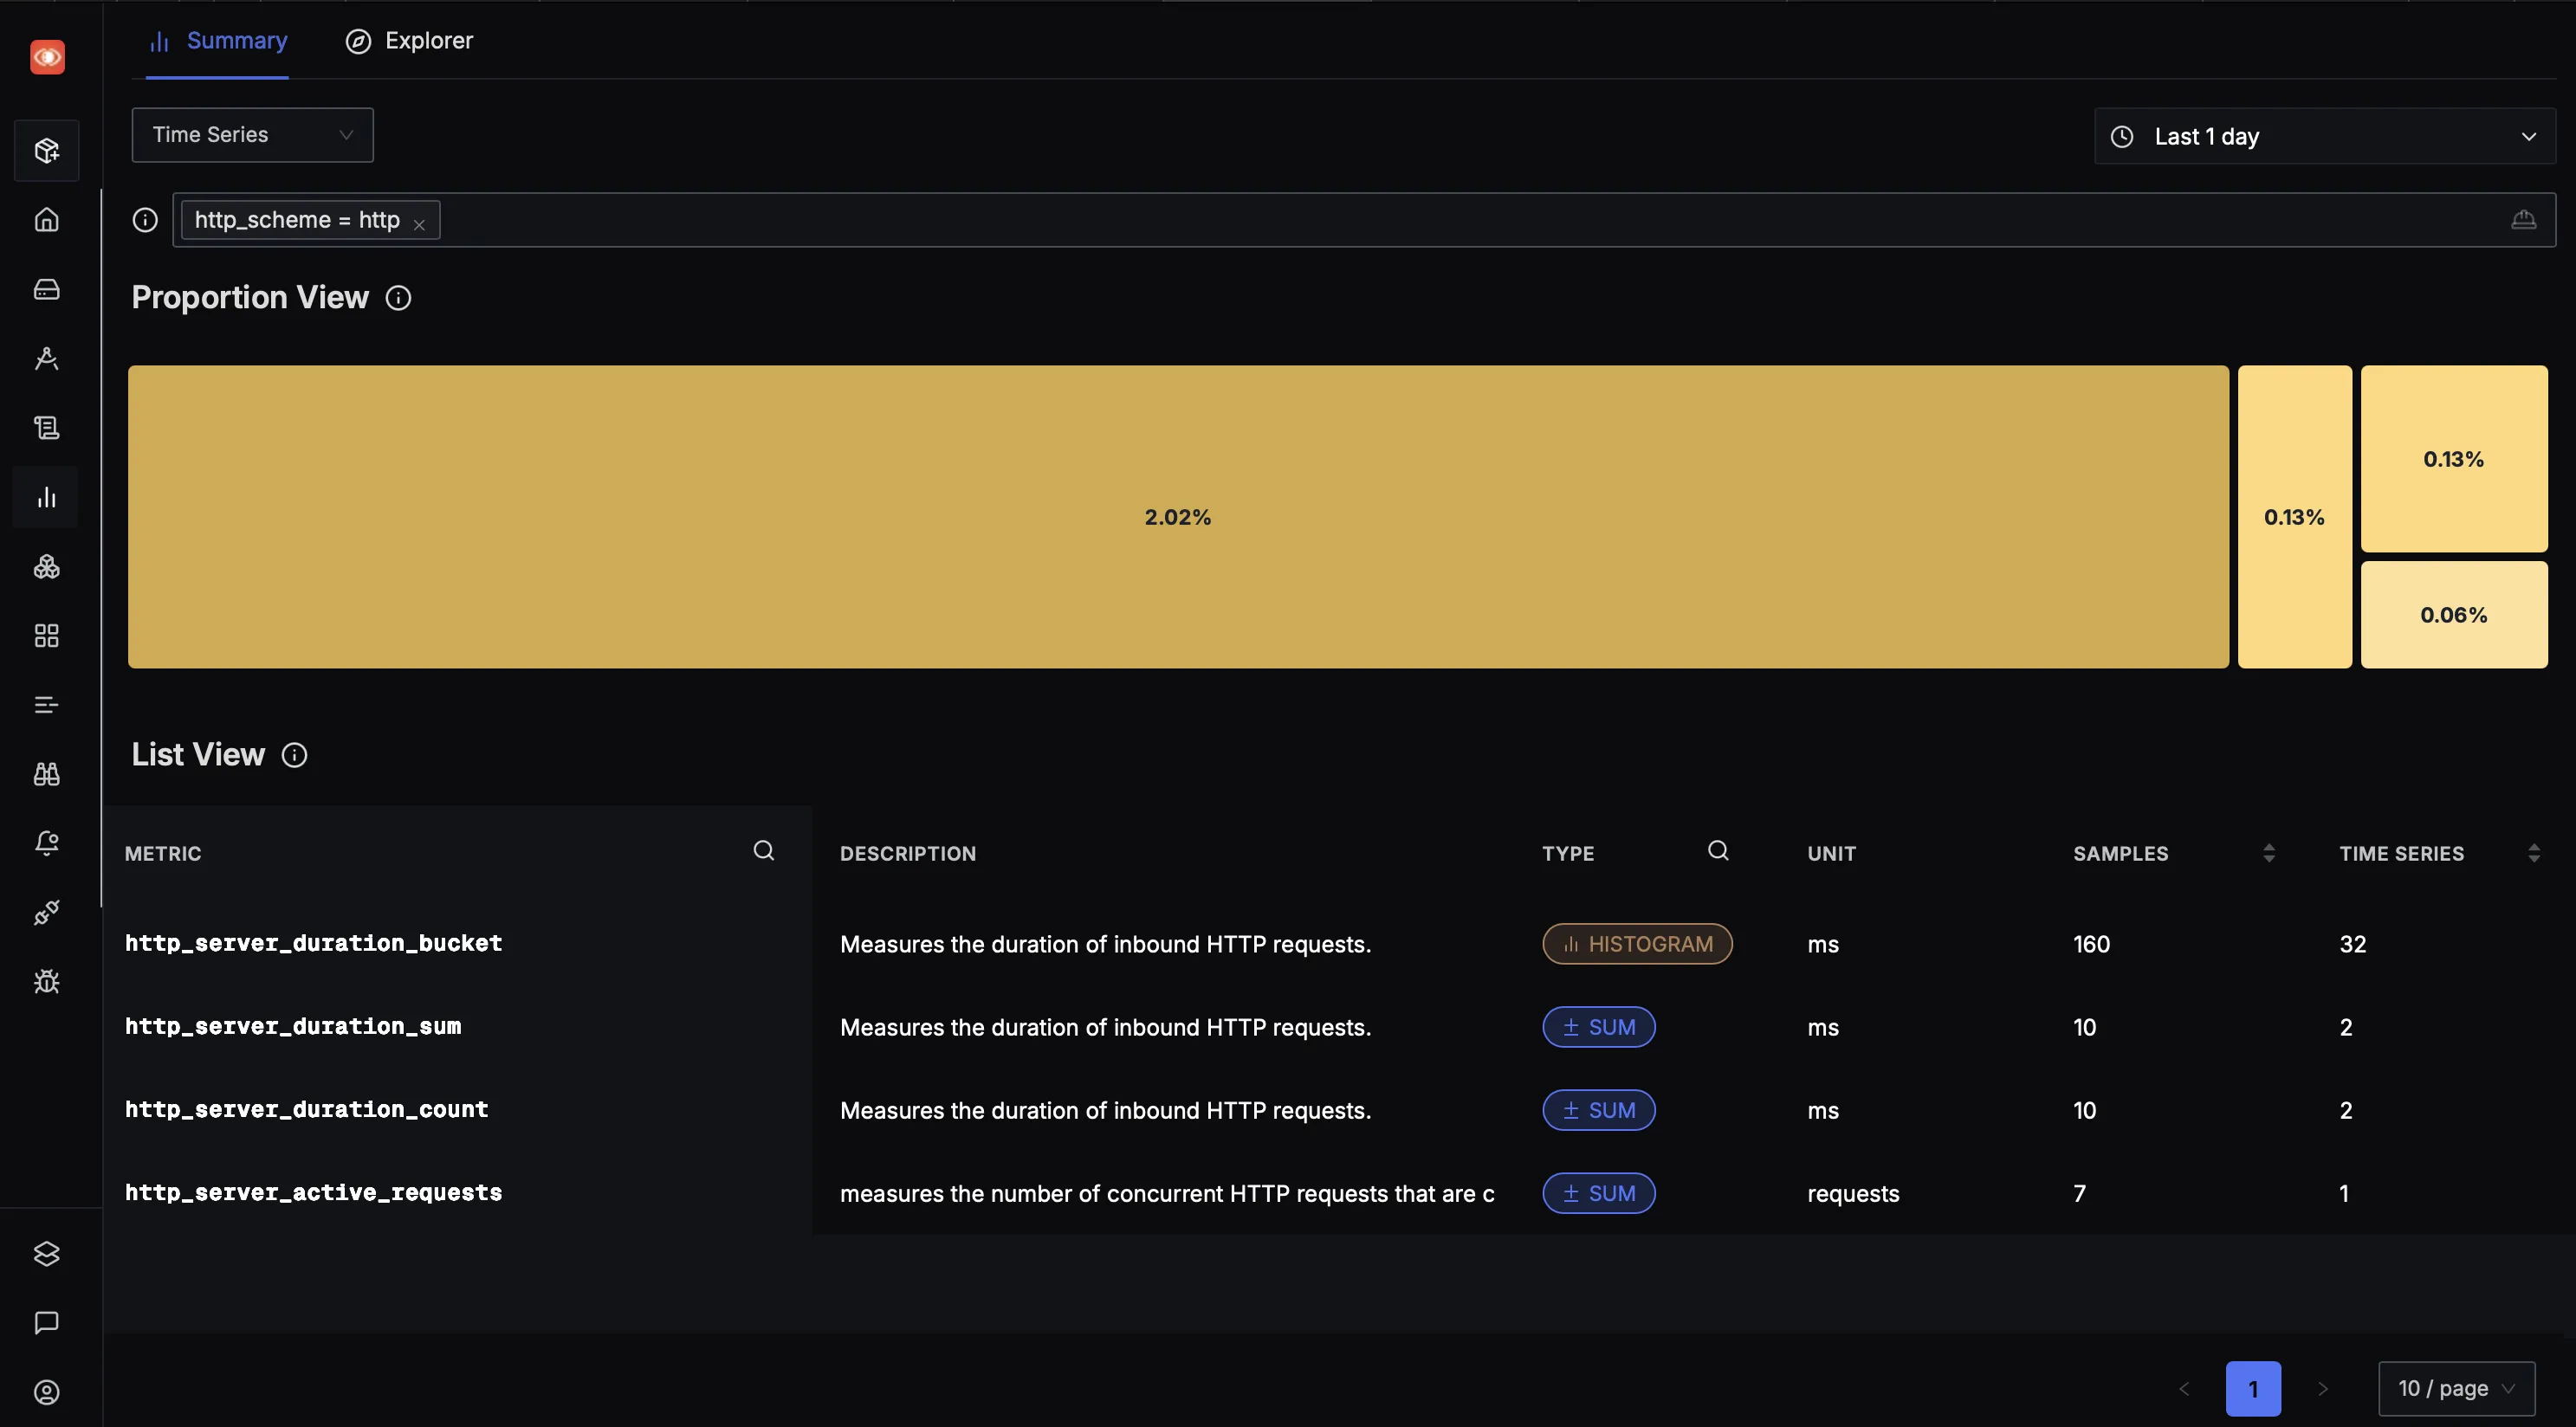
To confirm that the metrics are being sent to SigNoz, you can use the Metrics Explorer in SigNoz. To navigate to Metrics Explorer, simply click Metrics on the left sidebar.
The Metrics Explorer page will allow you to easily query metrics using built-in visual query builder. This will enable you to verify that the metrics are being sent correctly to SigNoz, including visualizing them, seeing their descriptions, types, and more.
Last updated: May 6, 2025
